Using HAProxy to do health checks to gRPC services
Haproxy is a great tool to do load balancing between microservers, but it current doesn’t support HTTP/2.0 nor gRPC directly. The only option now is to use tcp mode to load balance gRPC backend servers. It is however possible to implement intelligent health checks to gRPC enabled backends using “tcp-check send-binary” and “tcp-check expect binary” features. Here’s how:
First create a .proto service to represent a common way to obtain health check data from all of your servers. This should be shared with all your servers and projects as each gRPC endpoint can implement multiple different services. Here’s my servicestatus.proto as an example and it’s worth nothing that we should be able to add more fields into the StatusRequest and HealthCheckResult messages later if we want to extend the functionality without breaking the haproxy health check feature:
syntax = "proto3";

package servicestatus;

service HealthCheck {
  rpc Status (StatusRequest) returns (HealthCheckResult) {}
}

message StatusRequest {

}

message HealthCheckResult {
  string Status = 1;
}
The idea is that each service implements the servicestatus.HealthCheck service so that we can use same monitoring tools to monitor each and every different gRPC based service in our entire software ecosystem. In the HAProxy case I want that haproxy could call the HealthCheck.Status() function every few seconds and then the server would respond if everything is ok and that the server is capable of accepting new requests. The server should set the HealthCheckResult.Status field to “MagicResponseCodeOK” string when everything is good so that we can look for the magic string in the response inside haproxy.
Then I extended the service_greeter example (in node.js in this case) to implement this:
var PROTO_PATH = __dirname + '/helloworld.proto';

var grpc = require('../../');
var hello_proto = grpc.load(PROTO_PATH).helloworld;

var servicestatus_proto = grpc.load(__dirname + "/servicestatus.proto").servicestatus;
function sayHello(call, callback) {
  callback(null, {message: 'Hello ' + call.request.name});
}

function statusRPC(call, callback) {
  console.log("statusRPC", call);
  callback(null, {Status: 'MagicResponseCodeOK'});
}

/**
 * Starts an RPC server that receives requests for the Greeter service at the
 * sample server port
 */
function main() {
  var server = new grpc.Server();
  server.addProtoService(hello_proto.Greeter.service, {sayHello: sayHello});
  server.addProtoService(servicestatus_proto.HealthCheck.service, { status: statusRPC });
  server.bind('0.0.0.0:50051', grpc.ServerCredentials.createInsecure());
  server.start();
}

main();
Then I also wrote a simple client to do a single RPC request to the HealthCheck.Status function:
var PROTO_PATH = __dirname + '/servicestatus.proto';

var grpc = require('../../');
var servicestatus_proto = grpc.load(PROTO_PATH).servicestatus;

function main() {
  var client = new servicestatus_proto.HealthCheck('localhost:50051', grpc.credentials.createInsecure());
  client.status({}, function(err, response) {
    console.log('Greeting:', response);
  });
}

main();
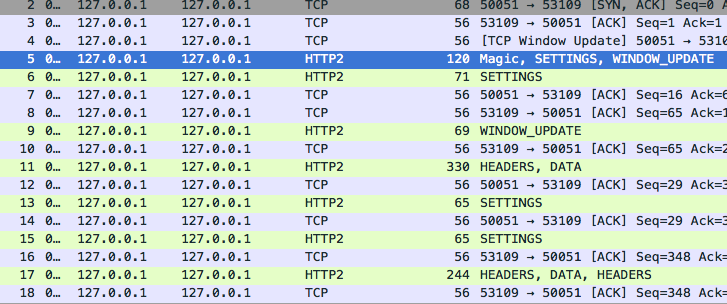
What followed was a brief and interesting exploration into how HTTP/2.0 protocol works and how gRPC uses HTTP/2.0 to work. After a brief moment with Wireshark I was able to explore the different frames inside a HTTP/2.0 request:
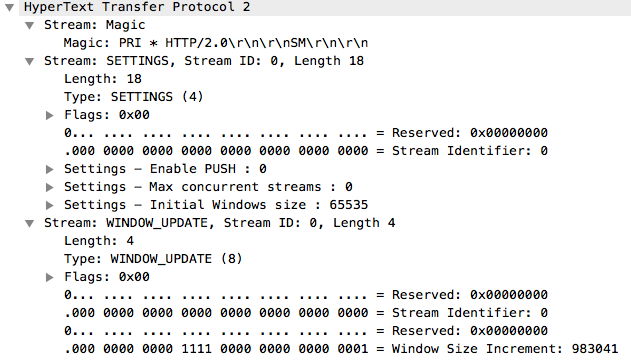
We can see here how the HTTP/2 request starts with first a Magic frame following with a SETTINGS frame. It seems that in this case we don’t need the WINDOW_UPDATE frame when we later construct our own request. If we look closer on the packet #5 with Wireshark we can see this:
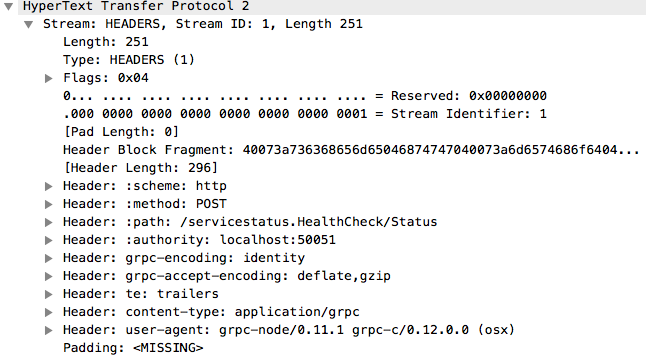
The Magic and SETTINGS are required in the start of each HTTP/2 request. After these gRPC sends a HEADERS frame which contains the interesting parts:
There’s also a DATA which in this case contains the protocolbuffers encoded payload of the function arguments. The DATA frame is analogous to the POST data payload in the HTTP/1 version, if that helps you to understand what’s going on.
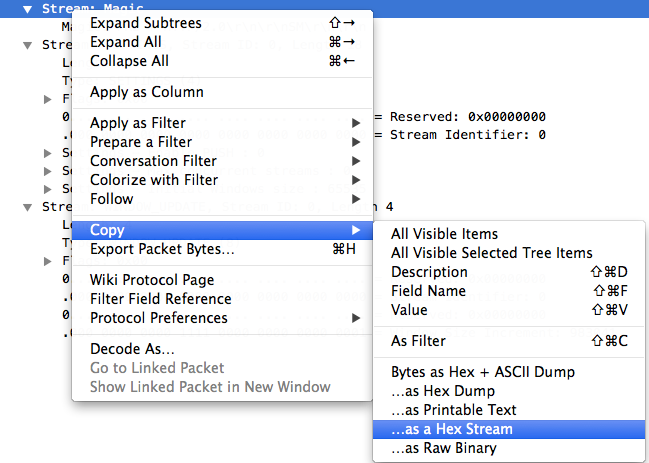
What I did next is that I simply copied the Magic, SETTINGS, HEADERS and DATA frames as a raw Hex string and wrote a simple node.js program to test my work:
var net = require('net');

var client = new net.Socket();
client.connect(50051, '127.0.0.1', function() {
	console.log('Connected');

	var magic = new Buffer("505249202a20485454502f322e300d0a0d0a534d0d0a0d0a", "hex");
	client.write(magic);

	var settings = new Buffer("00001204000000000000020000000000030000000000040000ffff", "hex");
	client.write(settings);

	var headers = new Buffer("0000fb01040000000140073a736368656d65046874747040073a6d6574686f6404504f535440053a70617468212f736572766963657374617475732e4865616c7468436865636b2f537461747573400a3a617574686f726974790f6c6f63616c686f73743a3530303531400d677270632d656e636f64696e67086964656e746974794014677270632d6163636570742d656e636f64696e670c6465666c6174652c677a69704002746508747261696c657273400c636f6e74656e742d747970651061
	client.write(headers);

	var data = new Buffer("0000050001000000010000000000", "hex");
	client.write(data);

});

client.on('data', function(data) {
	console.log('Received: ' + data);
});

client.on('close', function() {
	console.log('Connection closed');
});
Now when I ran this node.js client code I correctly managed to create a gRPC request to the server and I could see the result, especially the MagicResponseCodeOK string. So how can we use this with HAProxy? We can simply define a backend with “mode tcp” and to concatenate the different HTTP/2 frames into one “tcp-check send-binary” blob and ask haproxy to look for the MagicResponseCodeOK string in the response. I’m not 100% sure yet that this works across all different gRPC implementations, but it’s a great start for a technology demonstration so that we don’t need to wait for HTTP/2 support in haproxy.
listen grpc-test
	mode tcp
	bind *:50051
	option tcp-check
	tcp-check send-binary 505249202a20485454502f322e300d0a0d0a534d0d0a0d0a00001204000000000000020000000000030000000000040000ffff0000fb01040000000140073a736368656d65046874747040073a6d6574686f6404504f535440053a70617468212f736572766963657374617475732e4865616c7468436865636b2f537461747573400a3a617574686f726974790f6c6f63616c686f73743a3530303531400d677270632d656e636f64696e67086964656e746974794014677270632d6163636570742d656e636f64696e670c6465666c6174652c677a69704002746508747261696c657273400c636f6e74656e742d74797065106170706c69636174696f6e2f67727063400a757365722d6167656e7426677270632d6e6f64652f302e31312e3120677270632d632f302e31322e302e3020286f73782900000500010000000100000000000000050001000000010000000000
	tcp-check expect binary 4d61676963526573706f6e7365436f64654f4b
	server 10.0.0.1 10.0.0.1:50051 check inter 2000 rise 2 fall 3 maxconn 100
There you go. =)


