Optimize nginx ssl termination cpu usage with cipher selection

I have a fairy typical setup where I have nginx in front of haproxy, where nginx is terminating the ssl connections from client browsers. As our product grew, my loadbalancer machines didn’t have enough CPU to do all the required ssl processing.

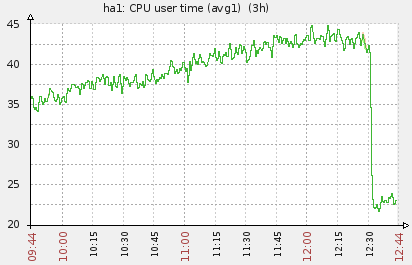
As this zabbix screenshot shows, the nginx takes more and more cpu, until it hits the limit of our AWS c1.xlarge instance. This causes delays for our users and some requests might even time out.

Luckily it turns out that there was a fairy easy way to solve this. nginx defaults, at least in our environment, into a cipher called DHE-RSA-AES256-SHA. This cipher uses Diffie-Hellman Ephemeral key exchange protocol, which uses a lot of CPU. With help from this and this blog posts I ended up with the following sollution:

First check if your server uses the slow DHE-RSA-AES256-SHA cipher:

openssl s_client -host your.host.com -port 443

Look for the following line:

Cipher    : DHE-RSA-AES256-SHA

This tells us that we can optimize the CPU usage by selecting faster cipher. Because I’m using AWS instances and these instances don’t support the AESNI (Hardware accelerated processor instructions for calculationg AES) I ened up with following cipher list (read more what this means from here):

RC4-SHA:AES128-SHA:AES:!ADH:!aNULL:!DH:!EDH:!eNULL

If your box can support AESNI you might want to prefer AES over RC4. It’s not the safest cipher choice out there, but more than good enough for our use. Check out this blog post for more information.

So, I added these two lines to my nginx.conf

ssl_ciphers RC4-SHA:AES128-SHA:AES:!ADH:!aNULL:!DH:!EDH:!eNULL;
ssl_prefer_server_ciphers on;

After restarting nginx you should verify that the correct cipher is now selected by running the openssl s_client command again. In my case it now says:

Cipher    : RC4-SHA

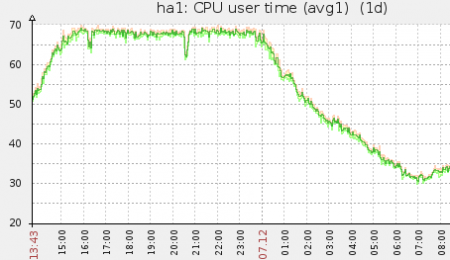
All done! My CPU load graphs also shows a clear performance boost. Nice and easy victory.
 

Implementing Multi Level Security in Windows 7 with VirtualBox and VMLite

I’ve been experimenting with a Multi Level Security implementation in Windows 7 using VirtualBox and VMLite to run Chrome and other browsers inside a virtual machine (guest system) and to use this browser as the default browser for the entire computer (host system) for additional security. This setup allows to click any HTTP link inside pretty much any running program and make that url to load itself into a browser running inside the virtual machine.

This gives us an extra layer of security besides the normal Chrome sandboxing. Also all other usual VM features like snapshotting, reverting to a snapshot, clipboard between host and guest operation system, seamless mode, networking etc are all available. In practice the software running inside VM can’t be easily tell apart from non virtualized programs.

VMLite Workstation is a software built upon VirtualBox which allows to run a Windows XP instance in Seamless mode over a host operating system (Windows 7 in this case). You need a Windows XP license which is available at least with Windows 7 Professional version. This guide shows how to install Windows XP Mode which comes with Windows 7 Professional into a virtual machine and to configure a Chrome browser inside the VM to act as the default browser for the host operating system.

Installation Instructions for VMLites and the Windows XP virtual image:

  1. Download Virtual XP Mode from http://www.microsoft.com/windows/virtual-pc/download.aspx and install it with the default settings.
  2. Download VMLite Workstation from http://www.vmlite.com/index.php/products/vmlite-workstation
  3. Create new Virtual Image inside the VMLite workstation and give it  the installation location of the Virtual XP Mode.
  4. Now you should be able to boot the Virtual XP Mode within VMLite and install Chrome and other softwares which you feel you might need. Here’s a list for ideas which you should do:
    • Change Chrome theme to something else so you can tell apart the Chrome which runs inside the guest vm and the Chrome which runs in your host system.
    • Edit the VM settings to disable full read/write access to the shared folders and drivers and instead just give one predefined directory which you use to transfer files between the guest and the host operating systems.
  5. Remember to take a snapshot from the VM after you have setup your environment. This acts as a restore point in time so you can always reset your VM into this state if you do something stupid or think that the VM is compromised.

Making the Chrome inside VM to be the default browser for everything.

VMLite comes with a “Internet Explorer (secure)” shortcut with green borders which is installed onto your desktop. This shortcut starts Internet Explorer inside the VM. We’ll use this trick to pass Chrome.exe calls from the host system into the guest (VM) system with a .bat file and then making this .bat file the default browser program for the host system.

  1. First create a multilevel-security-browser.bat file by modifying these sources into some good location (I’ve placed it into F:\Users\Garo\VMLites\multilevel-security-browser.bat)
    @echo off
    pushd "C:\Program Files\VMLite\VMLite Workstation\"
    set path="C:\Program Files\VMLite\VMLite Workstation\";%path%
    vmlitectl run "VMLite XP Mode" "C:\Documents and Settings\Administrator\Local Settings\Application Data\Google\Chrome\Application\chrome.exe" "%*"
    popd

    Notice few things: The path line should have the VMLite installation directory inside the host system, the “VMLite XP Mode” should be the name of your VM and the chrome.exe path is the browser path inside the guest vm.

  2. Then create a multilevel-security-browser.reg file based on these sources:
    Windows Registry Editor Version 5.00
    
    [HKEY_CLASSES_ROOT\MultilevelSecurityBrowser]
    @="MultilevelSecurityBrowser"
    "URL Protocol"=""
    
    [HKEY_CLASSES_ROOT\MultilevelSecurityBrowser\DefaultIcon]
    @="C:\\Users\\garo\\AppData\\Local\\Google\\Chrome\\Application\\chrome.exe,0"
    
    [HKEY_CLASSES_ROOT\MultilevelSecurityBrowser\shell]
    
    [HKEY_CLASSES_ROOT\MultilevelSecurityBrowser\shell\open]
    
    [HKEY_CLASSES_ROOT\MultilevelSecurityBrowser\shell\open\command]
    @="\"f:\\Users\\garo\\VMLites\\multilevel-security-browser.bat\" -- \"%1\""
    
    [HKEY_CURRENT_USER\Software\Microsoft\Windows\Shell\Associations\UrlAssociations\http\UserChoice]
    "Progid"="MultilevelSecurityBrowser"

    and set the path for chrome.bat to the path where you created your multilevel-security-browser.bat. Notice that we use the chrome.exe as the source of our DefaultIcon which assumes that you have Chrome also installed into your host operating system.

  3. Save the multilevel-security-browser.reg file and click to Merge its contents with the Windows 7 registry. UAC will ask for a confirmation which you need to allow.
  4. We’re pretty much done here. You can now try to click some http url and if everything went correctly a black shell window will appear for a moment and the VM is started (if it isn’t already running) and the url should be opened inside Chrome in the guest vm.

I’ve used this setup only for a day now and so far it has worked nicely. the VMLite can be turned into Seamless mode and the Windows XP taskbar can be moved on the top of the screen and set it to Auto-Hide the taskbar.

Good analysis paper over Stuxnet worm

The W32.Stuxnet worm has raised quite much discussion as its been analysed and technical details about its construction has been revealed. Stuxnet is special because it’s very complex and its targeted to attack very specific set of industrial process computers. These and other worm characteristics hints that the worm was created by a government  sponsored virus laboratory.

Some notable Stuxnet features include:

  • Four zero day exploits to windows operating system.
  • Stolen driver authentication certificates, including two from Realtek
  • Targeted to specific installation – it didn’t infect if it found to be in wrong computer.
  • Very installation specific payload which altered the process of the industrial control operations.

The following quote from [http://langner.com/en/] sums up all this pretty well:

The attack combines an awful lot of skills — just think about the multiple 0day vulnerabilities, the stolen certificates etc. This was assembled by a highly qualified team of experts, involving some with specific control system expertise. This is not some hacker sitting in the basement of his parents house. To me, it seems that the resources needed to stage this attack point to a nation state.

Read the full analysis paper at http://www.eset.com/resources/white-papers/Stuxnet_Under_the_Microscope.pdf

Also read the symantec blog at http://www.symantec.com/connect/blogs/exploring-stuxnet-s-plc-infection-process